Microsoft Teams
- Register BotKube as a bot with Microsoft Bot Framework.
- Deploy the BotKube controller.
- Add the BotKube app to a channel and enable notifications.
Prerequisites
Unlike Slack/Mattermost, MS Teams apps communicate with backends by sending POST requests to the public endpoints. So to establish communications between Teams app and respective backend, it needs to be reachable from the outside world.
Now there are few different ways to enable access to the K8s Service from the outside cluster. We will be discussing the most common way i.e exposing using ingress resources.
Before we start, make sure you have -
- a domain name with the ability to configure DNS
- TLS cert and key for the registered domain name to configure SSL termination
- nginx-ingress controller deployed on your cluster
If you are new to Ingress and don’t know how to set up an ingress controller, please follow this blog by InfraCloud.
A. Register BotKube as a bot with Microsoft Bot Framework.
We will use “App Studio” to register and install Bot to MS Teams. Please follow the steps below to create and install BotKube App to your Team.
Install App Studio from the marketplace. Search for “App Studio” in the Apps section and add to the Teams
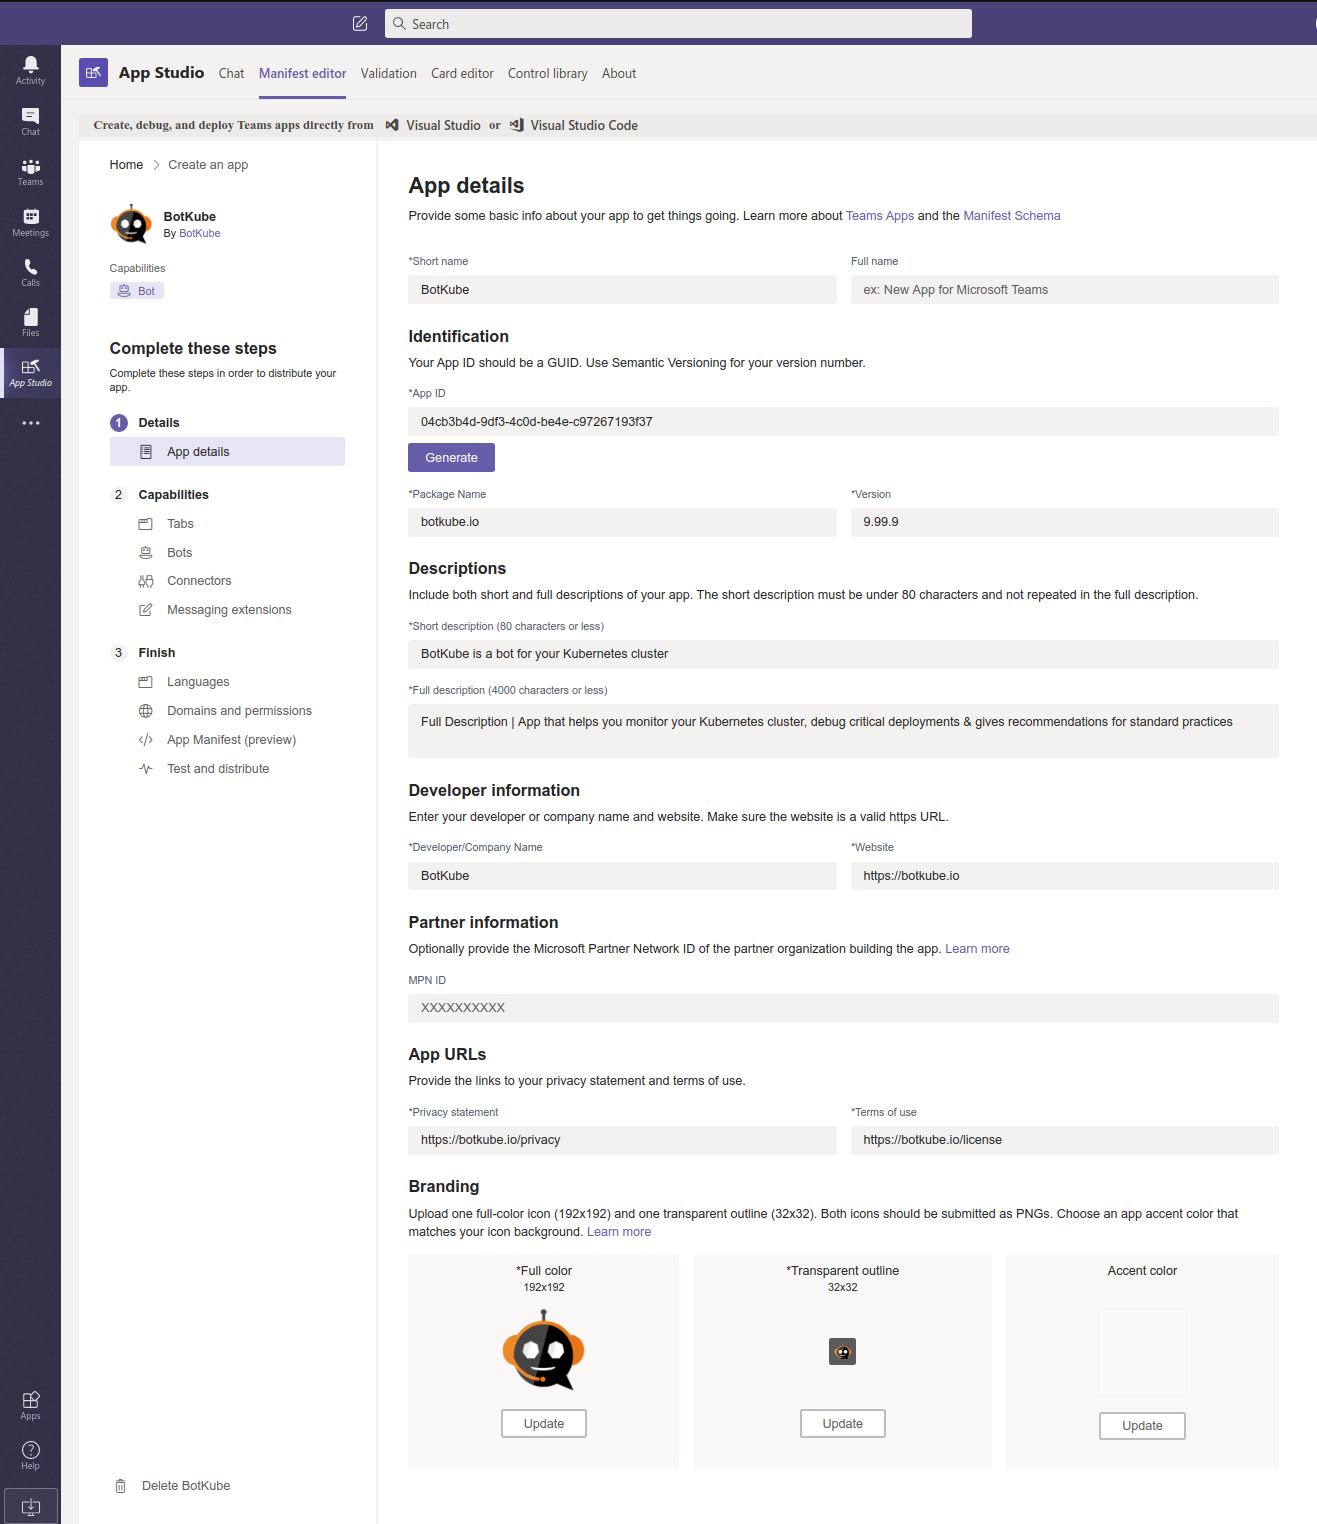
Open App Studio, Go to “Manifest editor” and choose “Create a new app”
Fill in the App details
Field Value Short name BotKube Package name botkube.io App ID <Click on Generate> Version 0.11.0 Short Description BotKube is a bot for your Kubernetes cluster Full Description App that helps you monitor your Kubernetes cluster, debug critical deployments & gives recommendations for standard practices. Developer/Company Name BotKube Website https://botkube.io Privacy statement https://botkube.io/privacy Terms of use https://botkube.io/license Click the checkbox on “Loading indicator” (optional)
Download BotKube icons from https://github.com/infracloudio/botkube/tree/develop/branding/logos and update Branding icons.

Add a Bot to the App
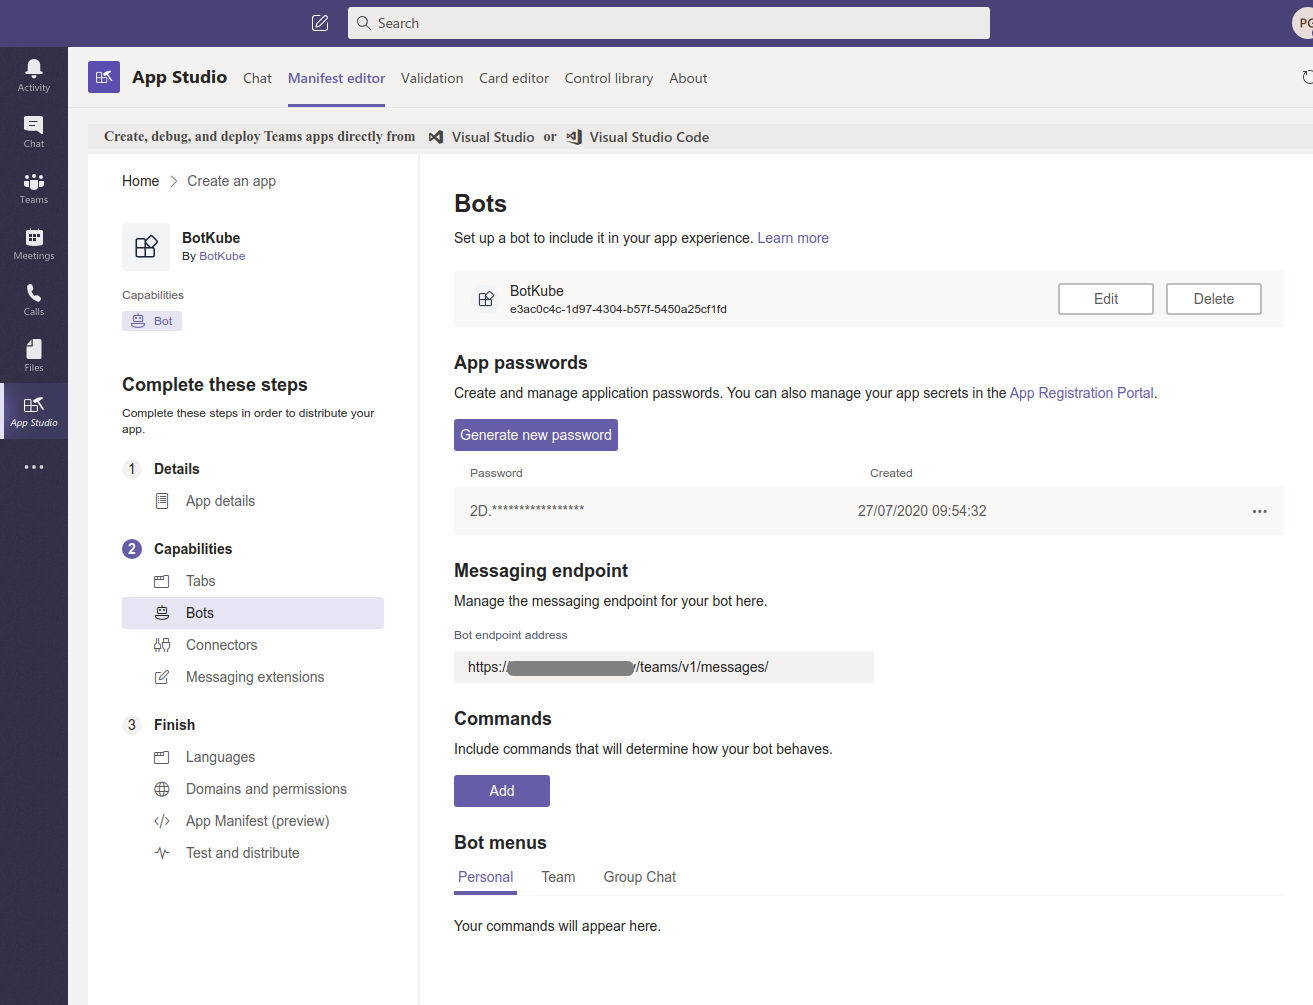
Go to Capabilities > Bots and fill in the info
Click “Set up”
Set “BotKube” name, and enable
- Messaging bot: [x] My bot supports uploading and downloading files
- Scope: [x] Personal & [x] Team And Create bot.
On the “Bots” page, click on Generate a new password. Note down the password required while installing BotKube backend.
Copy App ID displayed below Bot name in the heading. Note that Bot App ID is different than the one we generate on the “Apps Details” page.
Set Messaging Endpoint. The messaging endpoint is the URL on which BotKube backend listens for incoming requests from Teams. While deploying the BotKube backend you can give an option to expose BotKube via Ingress. Please check the prerequisites for more details.

Install Bot to Teams
Go to Finish >> Test and distribute and click on Install to install the BotKube app on teams.
If you face “You don’t have permissions to add BotKube to this team.”, contact your admin to provide an access to install apps on teams.
If you are using a free version of teams which does not have an admin center, you can click on Download to download the app manifest and then choose Upload a custom app option in the App center to install the app.
B. Deploy BotKube controller
The BotKube app we created on Teams sends messages to the endpoint we provided while configuring the app. To POST the requests to the BotKube controller, it needs to be reachable from the outside world.
Now there are few different ways to enable access to the K8s Service from the outside cluster. But we will be discussing the most common way i.e exposing using ingress resources.
Prerequisites
Before we start, make sure you have -
- a domain name with the ability to configure DNS
- TLS cert and key for the registered domain name to configure SSL termination
- nginx-ingress controller deployed on your cluster
If you are new to Ingress and don’t know how to set up an ingress controller, please follow this blog by InfraCloud.
Create a K8s TLS secret from cert and key for the SSL termination in botkube namespace
$ kubectl create secret tls botkube-tls -n botkube --cert=/path/to/cert.pem --key=/path/to/privatekey.pem
We will use this TLS secret while deploying the BotKube backend.
Using helm
- We will be using helm to install BotKube in Kubernetes. Follow this guide to install helm if you don’t have it installed already
- Add infracloudio chart repository
  $ helm repo add infracloudio https://infracloudio.github.io/charts
  $ helm repo update
- Deploy BotKube backend using helm install in your cluster.
  $ helm install --version v0.12.4 botkube --namespace botkube \
  --set communications.teams.enabled=true \
  --set communications.teams.appID=<APPLICATION_ID> \
  --set communications.teams.appPassword=<APPLICATION_PASSWORD> \
  --set config.settings.clustername=<CLUSTER_NAME> \
  --set config.settings.kubectl.enabled=<ALLOW_KUBECTL> \
  --set ingress.create=true \
  --set ingress.host=<HOST> \
  --set ingress.urlPath=<URLPATH> \
  --set ingress.tls.enabled=true \
  --set ingress.tls.secretName=<TLS_SECRET_NAME> \
  infracloudio/botkube
where,
- APPLICATION_ID is the BotKube application ID generated while registering Bot to Teams
- APPLICATION_PASSWORD is the BotKube application password generated while registering Bot to Teams
- CLUSTER_NAME is the cluster name set in the incoming messages
- ALLOW_KUBECTL set true to allow kubectl command execution by BotKube on the cluster
- HOST is the Hostname of endpoint provided while registering BotKube to Teams
- URLPATH is the path in endpoint URL provided while registering BotKube to Teams
- TLS_SECRET_NAME is the K8s TLS secret name for the SSL termination
Configuration syntax is explained here. A complete list of helm options is documented here
Send @BotKube ping in the channel to see if BotKube is running and responding.
With the default configuration, BotKube will watch all the resources in all the namespaces for create, delete and error events.
If you wish to monitor only specific resources, follow the steps given below:
Create new file config.yaml and add resource configuration as described on the configuration page.
(You can refer sample config from https://raw.githubusercontent.com/infracloudio/botkube/v0.12.4/helm/botkube/sample-res-config.yaml)
  config:
    ## Resources you want to watch
    resources:
    - name: v1/pods        # Name of the resource. Resource name must be in
                           # group/version/resource (G/V/R) format
                           # resource name should be plural
                           # (e.g apps/v1/deployments, v1/pods)
      namespaces:          # List of namespaces, "all" will watch all the namespaces
        include:
        - all
        ignore:            # List of namespaces to be ignored, used only with include: all
        - kube-system      # example : include [all], ignore [x,y,z]
      events:              # List of lifecycle events you want to receive,
                           # e.g create, update, delete, error OR all
      - create
      - delete
      - error
    - name: batch/v1/jobs
      namespaces:
        include:
        - ns1
        - ns2
      events:
      - create
      - update
      - delete
      - error
      updateSetting:
        includeDiff: true
        fields:
        - spec.template.spec.containers[*].image
        - status.conditions[*].type
Pass the yaml file as a flag to
helm installcommand. e.g$ helm install --version v0.12.4 --name botkube --namespace botkube -f /path/to/config.yaml --set=...other args..
Alternatively, you can also update the configuration at runtime as documented here
Using kubectl
- Make sure that you have kubectl cli installed and have access to the Kubernetes cluster
Download deployment specs yaml
$ wget -q https://raw.githubusercontent.com/infracloudio/botkube/v0.12.4/deploy-all-in-one.yamlUncomment BotKube service and ingress resource manifest.
Open downloaded deploy-all-in-one.yaml and update the configuration.
Set teams.enabled, APPLICATION_ID, APPLICATION_PASSWORD, HOST, URLPATH, TLS_SECRET_NAME and update the resource events configuration you want to receive notifications for in the configmap.
where,
- communications.teams.enabled set true to enable Teams support for BotKube
- APPLICATION_ID is the BotKube application ID generated while registering Bot to Teams
- APPLICATION_PASSWORD is the BotKube application password generated while registering Bot to Teams
- HOST is the Hostname of endpoint provided while registering BotKube to Teams
- URLPATH is the path in endpoint URL provided while registering BotKube to Teams
- TLS_SECRET_NAME is the K8s TLS secret name for the SSL termination
- settings.clustername is the cluster name set in the incoming messages
- settings.kubectl.enabled set true to allow kubectl command execution by BotKube on the cluster
Configuration syntax is explained here. Complete list of helm options is documented here
- Deploy the resources
$ kubectl create -f deploy-all-in-one.yaml
Verify if BotKube endpoint is reachable
Curl on the endpoint to confirm that the BotKube endpoint is reachable and serving the requests.
$ curl -k https://<HOST>/<URLPATH>
Authentication headers are missing in the request # Expected response
If you get 404, please check the ingress configuration or endpoint you configured while registering the app.
Add BotKube to a channel
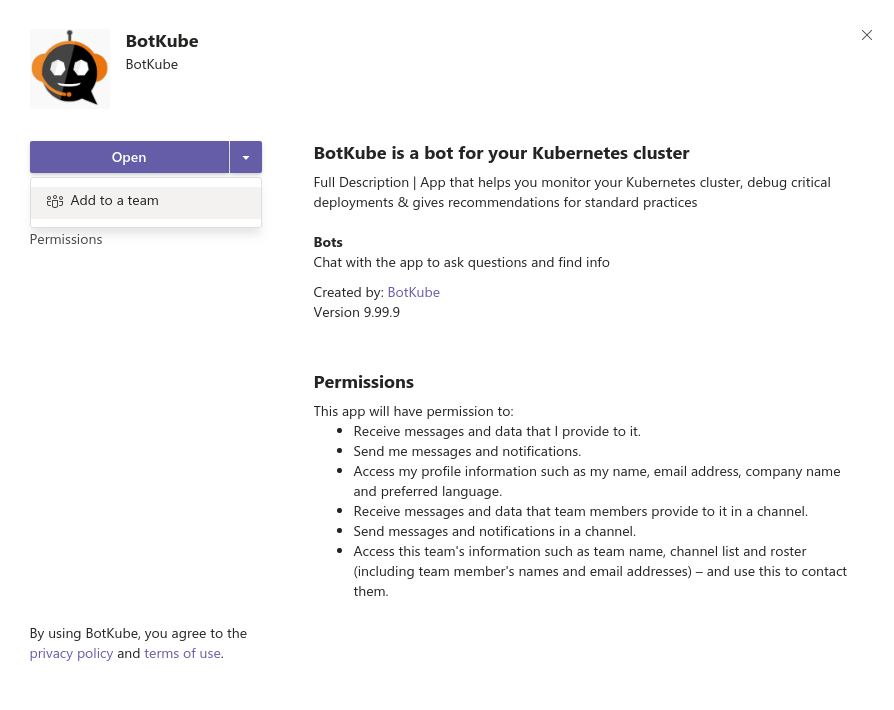
Go to Apps and select BotKube.
Click the drop-down option besides the “Open” button. That should show “Add to a team” option.

Type and select the channel name in which you want to receive notifications.
Once added, browse to the channel and type
@BotKube pingto make sure BotKube is responding. If BotKube responds, send@BotKube notifier startto enable notifications.
Remove BotKube from Kubernetes cluster
Using helm
If you have installed BotKube backend using helm, execute the following command to completely remove BotKube and related resources from your cluster.
$ helm delete --purge botkube
Using kubectl
$ kubectl delete -f https://raw.githubusercontent.com/infracloudio/botkube/v0.12.4/deploy-all-in-one.yaml